Monday, June 3, 2013

The Little Chair that Did!


So a couple months ago Jared and I were checking out one of our local thrift shops and we found this little beauty. I will fully admit I liked it but I wasn't in love so we left without it. We later went home and started to regret not snatching it up and Jared just couldn't pass it up so that's how we wound up with this little guy! 


The seat part was pretty worn so after lots of cleaning and sanding…..


We added some nails to the bottom so when we painted the chair it wouldn't stick to the floor..

and used painter's tape to tape off the legs...


there you have it! Our little chair makeover. Who knew a thrift store chair could look so good?
Pin It Now!

Wednesday, May 29, 2013

Bamboo bathroom blinds

I've been pondering for months about what to do for the window in the bathroom. I've seen many tutorials out there with mini blinds. I just didn't feel confident in the way they would hold up. Then I saw Young House Love's bamboo blinds that they added to their office and I fell in love!


So we decided to go and pick up these blinds from home depot. We installed them and think it adds so much warmth to the space. It will also complement the wood countertops we plan on doing for the vanity.


We're still working on the rest of the bathroom and don't want to reveal too much so we're going piece by piece. Here's the rest of our checklist for the bathroom:

- Buy new shower curtain
- Install new shower tile
- Replace shower rod
- Refinish old pink tub
- Replace shower head 
- Install new floor tile
- Replace/ refinish dated vanity
- Replace sink
- Frame out mirror
- Replace vanity lighting
- Add bamboo blinds
- Install vent fan
- Paint/prime walls 
- Paint ceiling
- Replace trim 
- Install new countertops
- Create custom drawer pull-outs for linen cabinets
- Install new cabinet hardware
- Paint cabinet doors
- Hang artwork
- Replace shower hardware
- Replace faucet 
- Remove magazine rack
- Recaulk bathtub
- Install crown molding


Pin It Now!

Monday, May 27, 2013

Finding the perfect light gray paint

For months we have been looking for inspiration for our upstairs bathroom. We intend for this bathroom to be the one used by guests so we want it to look super nice! The hallways are dark gray so we knew that we wanted to choose something lighter and brighter for the bathroom. I wanted it to feel clean and serene. We chose to stick with a light gray but choosing the right one proved to be a huge task. Not all gray paints are the same. I wanted a "true" gray. I searched the internet and finally settled on Nimbus Cloud by Martha Stewart.


The lighting in the bathroom isn't great and my camera is less than ideal but the bottom picture more accurately depicts the paint color. Sometimes it has a greenish blue tint but I think it's perfect! I love it so much I might use it in a few other rooms. 

Pin It Now!

Tuesday, May 21, 2013

Project Stain Fence COMPLETE!

Okay so we have literally been itching to get this fence taken care of since we moved in just over a year ago. It was old and weathered looking which can be nice but not in this case it just looked like it had seen many better years. We debated for a long time about what exactly to do with it…paint or stain? We were worried that because the wood had remained unprotected for so long that it would take the stain unevenly so we were initially leaning towards paint. So we went through a list of colors that we could potentially paint it. We have a yellowish-beige house, white trim and a brown roof. So what color do you choose? We were thinking white but white gets sooo dirty and there's no way we were going to spend all this time and money painting the fence to have it look like a mud pit when it rains. Sooo we then considered black….hmm….how often have you seen a black picket fence? I've seen plenty of wrought iron ones but not wood. We currently have no black on our house so it didn't make a lot of sense. We love black but a black fence would make too much of a statement…not sure a good one. So we went back to our original idea, let's stain it! We had already bought some stain last year in our attempt to stain the deck….we tried it and were pleasantly surprised that it turned out to be beautiful. At some point we realized we needed to just make a decision and stick with it. So here's our beautiful "new" fence…


So here were our steps:
1) Clean the fence (we used this pressure washer)
2) Let the fence dry thoroughly (we gave it a few days)
3) Find a couple sunny (not-so-windy) days to stain

We used this Semi-transparent Cabot stain in Cordovan Brown and for the most part it worked pretty well. Some areas of the wood as you may or may not be able to tell took to the stain differently but we weren't expecting perfection. 

So here's a cost breakdown:
- Pressure Washer (already owned)
- Paint Sprayer (already owned)
- Cabot Stain (11 gallons) ~$400 ** please note we do have a pretty large fence and this includes two coats on both sides. We probably could have saved more with a cheaper stain as well as hand brushing which was not an option as far as I was concerned!
 Total: $400

If you want to attempt staining or painting your fence with a paint sprayer I would consider checking out this video that we found helpful. Also be aware you will get some overspray so prepare for that but it took us about 1.5 hours to do each side one coat. We let it dry overnight and did another coat on each side the next day. So it took us about 3 hours total. Not too bad considering how long hand painting would have been (ouch)!


Pin It Now!

Monday, May 20, 2013

How to Edge a Garden Bed


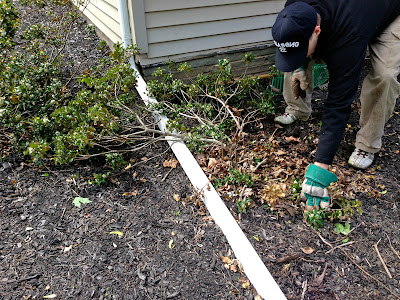
For several months I have been envying those beautiful sharp bedding lines. I've seen this done many ways whether it be with a machine, shovel or hand edger. We decided to go the edger route. We recently tore out the old holly bushes that's why there's so many bare spots. (see that here

We used:
-Half moon edger (here)
-Wheelbarrow
-Shovel
-Rake
-Gloves


…all the old edging was already coming up..

so we tore it all up….

we tackled this area first on the left side of the house...


 Jared picked a spot a few inches from the old edge of the bed and pressed the edger into the ground…


so Jared had a little too much fun with this part! 

 after stepping on the edger pull back towards you to loosen the soil… 

he kept moving along the trench as he stepped on the edger creating a consistent line...

 every once in a while we stopped to clean out the trenches...

We then discarded all the excess sod...

it'll look something like this until you level out your soil


We based our lines off the existing ones but came out a few inches….just know you can always take off more you can't take off less so start conservatively...


here Jared is evening out the slope (we don't want a steep drop-off). We also used a metal rake to even the soil out...


There you have it! Beautiful crisp lines! Next step mulch...

 Note: You can use a garden hose or string to help create lines if you have trouble eying it. Pin It Now!

Tuesday, May 14, 2013

Holly Bush Removal

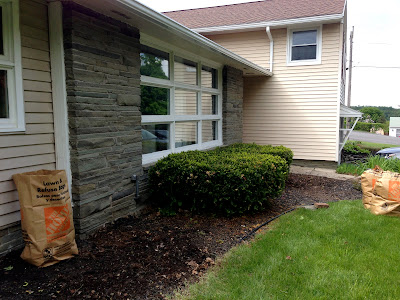
On our long to do list for the warm season of 2013, we have the removal of our wretched looking holly bushes. We have lived here for a year now and really didn't want to have to remove them but no matter what we did they just wouldn't "perk" up. It probably has a lot to do with the fact the snow falls right off the roof and onto those bushes flattening them. I'm sure it's happened every year before we moved into the house since they were planted. Now their leaves are turning brown and they just look awful. So sad (or not so sad) to say we have removed them! Not quite sure yet what we are replacing them with just yet but we might also be removing the bushes in front of the window as well. Heck why don't we just remove the entire landscaping in the front yard while were at it, I mean we're more than halfway there! 


Not much there anymore but still I think it looks better than it did! 


Wow hello downspout...

…now that the holly is removed it makes the downspout that much more obvious! That'll be changing soon! :)

So here's what our updated list for outside is:
-Trim back the ornamental grasses
-Clean out flower beds
-Trim Grapevines
-Mulch all beds
-Edge all beds
-Cut down holly bushes
-Reseed patchy areas of lawn
-Mailbox Makeover
-Plant a garden
-Restore the deck
-Remove old deck benches and install planters
-Paint/repair fence
-Install house numbers somewhere on front of house
-Reseal driveway
-Redo retaining wall
-Resurface concrete sidewalk and steps
-Spray paint outdoor furniture
-Remove "weed/junk garden" on side of house and seed it
-Paint vinyl siding to match rest of house
-Paint/ disguise downspouts
-Plant red twig dogwood bushes on side of house
-Create an herb garden
-Build an air conditioner cover
-Replace Shutters
-Spray paint lamp post and handrails

Pin It Now!